
Spring Boot starter总结(5)
Spring
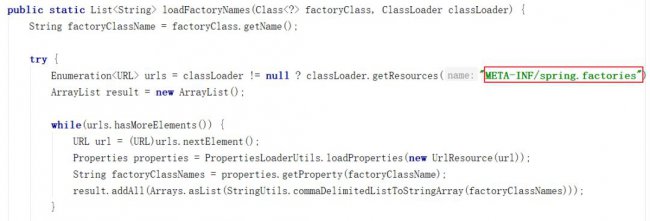
SpringFactoriesLoader的loadFactoryNames静态方法可以从所有的jar包中读取META-INF/spring.factories文件,而自动配置的类就在这个文件中进行配置:

spring.factories文件内容如下:

这样Spring Boot就可以加载到MybatisAutoConfiguration这个配置类了。
2.2.5. Bean的加载
在Spring Boot应用中要让一个普通类交给Spring容器管理,通常有以下方法:
1.使用 @Configuration与@Bean 注解
2.使用@Controller @Service @Repository @Component 注解标注该类并且启用@ComponentScan自动扫描
3.使用@Import 方法
其中Spring Boot实现自动配置使用的是@Import注解这种方式,AutoConfigurationImportSelector类的selectImports方法返回一组从META-INF/spring.factories文件中读取的bean的全类名,这样Spring Boot就可以加载到这些Bean并完成实例的创建工作。
2.3. 自动配置总结
我们可以将自动配置的关键几步以及相应的注解总结如下:
1.@Configuration与@Bean:基于Java代码的bean配置
2.@Conditional:设置自动配置条件依赖
3.@EnableConfigurationProperties与@ConfigurationProperties:读取配置文件转换为bean
4.@EnableAutoConfiguration与@Import:实现bean发现与加载
3 自定义starter
本小节我们通过自定义两个starter来加强starter的理解和应用。
3.1 案例一
3.1.1 开发starter
第一步:创建starter工程hello-spring-boot-starter并配置pom.xml文件
<?xml version="1.0" encoding="UTF-8"?>
<project xmlns="http://maven.apache.org/POM/4.0.0"
         xmlns:xsi="http://www.w3.org/2001/XMLSchema-instance"
         xsi:schemaLocation="http://maven.apache.org/POM/4.0.0
                             http://maven.apache.org/xsd/maven-4.0.0.xsd">
    <modelVersion>4.0.0</modelVersion>
    <parent>
        <groupId>org.springframework.boot</groupId>
        <artifactId>spring-boot-starter-parent</artifactId>
        <version>2.7.14</version>
        <relativePath/>
    </parent>
    <groupId>com.zbbmeta</groupId>
    <artifactId>hello-spring-boot-starter</artifactId>
    <version>1.0-SNAPSHOT</version>
    <dependencies>
        <dependency>
            <groupId>org.springframework.boot</groupId>
            <artifactId>spring-boot-starter</artifactId>
        </dependency>
        <dependency>
            <groupId>org.springframework.boot</groupId>
            <artifactId>spring-boot-autoconfigure</artifactId>
        </dependency>
    </dependencies>
</project>
第二步:创建配置属性类HelloProperties
package com.zbbmeta.config;
import org.springframework.boot.context.properties.ConfigurationProperties;
/*
 *读取配置文件转换为bean
 * */
@ConfigurationProperties(prefix = "hello")
public class HelloProperties {
    private String name;
    private String address;
    public String getName() {
        return name;
    }
    public void setName(String name) {
        this.name = name;
    }
    public String getAddress() {
        return address;
    }
    public void setAddress(String address) {
        this.address = address;
    }
    @Override
    public String toString() {
        return "HelloProperties{" +
                "name='" + name + '\'' +
                ", address='" + address + '\'' +
                '}';
    }
}
第三步:创建服务类HelloService
package com.zbbmeta.service;
public class HelloService {
    private String name;
    private String address;
    public HelloService(String name, String address) {
        this.name = name;
        this.address = address;
    }
    public String sayHello(){
        return "你好!我的名字叫 " + name + ",我来自 " + address;
    }
}
第四步:创建自动配置类HelloServiceAutoConfiguration
package com.zbbmeta.config;
import com.zbbmeta.service.HelloService;
import org.springframework.boot.autoconfigure.condition.ConditionalOnMissingBean;
import org.springframework.boot.context.properties.EnableConfigurationProperties;
import org.springframework.context.annotation.Bean;
import org.springframework.context.annotation.Configuration;
/*
* 配置类,基于Java代码的bean配置
* */
@Configuration
@EnableConfigurationProperties(HelloProperties.class)
public class HelloServiceAutoConfiguration {
    private HelloProperties helloProperties;
    //通过构造方法注入配置属性对象HelloProperties
    public HelloServiceAutoConfiguration(HelloProperties helloProperties) {
        this.helloProperties = helloProperties;
    }
    //实例化HelloService并载入Spring IoC容器
    @Bean
    @ConditionalOnMissingBean
    public HelloService helloService(){
        return new HelloService(helloProperties.getName(),helloProperties.getAddress());
    }
}
第五步:在resources目录下创建META-INF/spring.factories
org.springframework.boot.autoconfigure.EnableAutoConfiguration=\
com.zbbmeta.config.HelloServiceAutoConfiguration
至此starter已经开发完成了,可以将当前starter安装到本地maven仓库供其他应用来使用。
3.1.2. 使用starter
第一步:创建maven工程myapp并配置pom.xml文件
<?xml version="1.0" encoding="UTF-8"?>
<project xmlns="http://maven.apache.org/POM/4.0.0"
         xmlns:xsi="http://www.w3.org/2001/XMLSchema-instance"
         xsi:schemaLocation="http://maven.apache.org/POM/4.0.0 http://maven.apache.org/xsd/maven-4.0.0.xsd">
    <modelVersion>4.0.0</modelVersion>
    <parent>
        <groupId>org.springframework.boot</groupId>
        <artifactId>spring-boot-starter-parent</artifactId>
        <version>2.7.14</version>
        <relativePath/>
    </parent>
    <groupId>com.zbbmeta</groupId>
    <artifactId>myapp</artifactId>
    <version>1.0-SNAPSHOT</version>
    <dependencies>
        <dependency>
            <groupId>org.springframework.boot</groupId>
            <artifactId>spring-boot-starter-web</artifactId>
        </dependency>
        <!--导入自定义starter-->
        <dependency>
            <groupId>cn.itcast</groupId>
            <artifactId>hello-spring-boot-starter</artifactId>
            <version>1.0-SNAPSHOT</version>
        </dependency>
    </dependencies>
</project>
第二步:创建application.yml文件
server:
  port: 8080
hello:
  name: xiaoming
  address: beijing
第三步:创建HelloController
package com.zbbmeta.controller;
import com.zbbmeta.service.HelloService;
import org.springframework.beans.factory.annotation.Autowired;
import org.springframework.web.bind.annotation.GetMapping;
import org.springframework.web.bind.annotation.RequestMapping;
import org.springframework.web.bind.annotation.RestController;
@RestController
@RequestMapping("/hello")
public class HelloController {
    //HelloService在我们自定义的starter中已经完成了自动配置,所以此处可以直接注入
    @Autowired
    private HelloService helloService;
    @GetMapping("/say")
    public String sayHello(){
        return helloService.sayHello();
    }
}
第四步:创建启动类HelloApplication
package com.zbbmeta;
import org.springframework.boot.SpringApplication;
import org.springframework.boot.autoconfigure.SpringBootApplication;
@SpringBootApplication
public class HelloApplication {
    public static void main(String[] args) {
        SpringApplication.run(HelloApplication.class,args);
    }
}
执行启动类main方法,访问地址http://localhost:8080/hello/say

3.2 案例二
在前面的案例一中我们通过定义starter,自动配置了一个HelloService实例。本案例我们需要通过自动配置来创建一个拦截器对象,通过此拦截器对象来实现记录日志功能。
我们可以在案例一的基础上继续开发案例二。
3.2.1 开发starter
第一步:在hello-spring-boot-starter的pom.xml文件中追加如下maven坐标
<dependency>
    <groupId>org.springframework.boot</groupId>
    <artifactId>spring-boot-starter-web</artifactId>
    <optional>true</optional>
</dependency>
<dependency>
    <groupId>org.springframework.boot</groupId>
    <artifactId>spring-boot-configuration-processor</artifactId>
</dependency>
第二步:自定义MyLog注解
package com.zbbmeta.log;
import java.lang.annotation.ElementType;
import java.lang.annotation.Retention;
import java.lang.annotation.RetentionPolicy;
import java.lang.annotation.Target;
@Target(ElementType.METHOD)
@Retention(RetentionPolicy.RUNTIME)
public @interface MyLog {
    /**
     * 方法描述
     */
    String desc() default "";
}
第三步:自定义日志拦截器MyLogInterceptor
package com.zbbmeta.log;
import org.springframework.web.method.HandlerMethod;
import org.springframework.web.servlet.ModelAndView;
import org.springframework.web.servlet.handler.HandlerInterceptorAdapter;
import javax.servlet.http.HttpServletRequest;
import javax.servlet.http.HttpServletResponse;
import java.lang.reflect.Method;
/**
 * 日志拦截器
 */
public class MyLogInterceptor extends HandlerInterceptorAdapter {
    private static final ThreadLocal<Long> startTimeThreadLocal = new ThreadLocal<>();
    public boolean preHandle(HttpServletRequest request, HttpServletResponse response,
                             Object handler) throws Exception {
        HandlerMethod handlerMethod = (HandlerMethod)handler;
        Method method = handlerMethod.getMethod();//获得被拦截的方法对象
        MyLog myLog = method.getAnnotation(MyLog.class);//获得方法上的注解
        if(myLog != null){
            //方法上加了MyLog注解,需要进行日志记录
            long startTime = System.currentTimeMillis();
            startTimeThreadLocal.set(startTime);
        }
        return true;
    }
    public void postHandle(HttpServletRequest request, HttpServletResponse response,
                           Object handler, ModelAndView modelAndView) throws Exception {
        HandlerMethod handlerMethod = (HandlerMethod)handler;
        Method method = handlerMethod.getMethod();//获得被拦截的方法对象
        MyLog myLog = method.getAnnotation(MyLog.class);//获得方法上的注解
        if(myLog != null){
            //方法上加了MyLog注解,需要进行日志记录
            long endTime = System.currentTimeMillis();
            Long startTime = startTimeThreadLocal.get();
            long optTime = endTime - startTime;
            String requestUri = request.getRequestURI();
            String methodName = method.getDeclaringClass().getName() + "." +
                    method.getName();
            String methodDesc = myLog.desc();
            System.out.println("请求uri:" + requestUri);
            System.out.println("请求方法名:" + methodName);
            System.out.println("方法描述:" + methodDesc);
            System.out.println("方法执行时间:" + optTime + "ms");
        }
    }
}
第四步:创建自动配置类MyLogAutoConfiguration,用于自动配置拦截器、参数解析器等web组件
package com.zbbmeta.config;
import com.zbbmeta.log.MyLogInterceptor;
import org.springframework.context.annotation.Configuration;
import org.springframework.web.servlet.config.annotation.InterceptorRegistry;
import org.springframework.web.servlet.config.annotation.WebMvcConfigurer;
/**
 * 配置类,用于自动配置拦截器、参数解析器等web组件
 */
@Configuration
public class MyLogAutoConfiguration implements WebMvcConfigurer{
    //注册自定义日志拦截器
    public void addInterceptors(InterceptorRegistry registry) {
        registry.addInterceptor(new MyLogInterceptor());
    }
}
第五步:在spring.factories中追加MyLogAutoConfiguration配置
org.springframework.boot.autoconfigure.EnableAutoConfiguration=\
com.zbbmeta.config.HelloServiceAutoConfiguration,\
com.zbbmeta.config.MyLogAutoConfiguration
注意:我们在hello-spring-boot-starter中追加了新的内容,需要重新打包安装到maven仓库。
2.3.2.2 使用starter
在myapp工程的Controller方法上加入@MyLog注解
package com.zbbmeta.controller;
import com.zbbmeta.log.MyLog;
import com.zbbmeta.service.HelloService;
import org.springframework.beans.factory.annotation.Autowired;
import org.springframework.web.bind.annotation.GetMapping;
import org.springframework.web.bind.annotation.RequestMapping;
import org.springframework.web.bind.annotation.RestController;
@RestController
@RequestMapping("/hello")
public class HelloController {
    //HelloService在我们自定义的starter中已经完成了自动配置,所以此处可以直接注入
    @Autowired
    private HelloService helloService;
    @MyLog(desc = "sayHello方法") //日志记录注解
    @GetMapping("/say")
    public String sayHello(){
        return helloService.sayHello();
    }
}
访问地址:http://localhost:8080/hello/say,查看控制台输出:
请求uri:/hello/say
请求方法名:com.zbbmeta.controller.HelloController.sayHello
方法描述:sayHello方法
方法执行时间:36ms
以上就是IT袋网带来的Spring Boot starter总结的全部内容,网友们不妨在这方面予以借鉴
相关阅读
-

oracle vm virtualbox是什么 怎么用
oracle vm virtualbox是什么 怎么用,有很大一部分网友不知道这是个什么软件,装界面又是英文的,更是以难为难,电脑知识网专门为大家录制了oracle vm virtualbox视频教程教大家使用。 oracle vm Vir
-

服务器怎么维护 服务器维护有哪些内容?
今日IT小知识分享:服务器怎么维护方面的讲解,接下来小编为网友介绍。 维护是保证服务器稳定运行的必要步骤。作为一名服务器管理员,必须掌握服务器维护的技巧和方法,及时检查、更
-
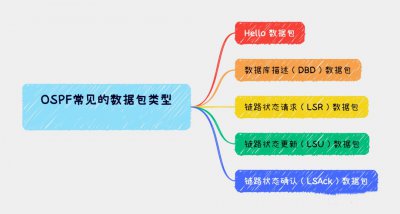
OSPF数据包类型有哪些? rate_limit_exceeded
小编为你解答OSPF数据包类型有哪些的电脑小知识,一定能解决您的问题的,一起来了解吧! OSPF使用不同类型的数据包来执行不同的功能,以下是OSPF常见的数据包类型: Hello 数据包 :Hello数据
-

swiper是什么插件 有什么用?
Swiper常用于移动端网站的内容触摸滑动 Swiper是纯javascript打造的滑动特效插件,面向手机、平板电脑等移动终端。 Swiper能实现触屏焦点图、触屏Tab切换、触屏轮播图切换等常用效果。 Swiper开源